English
 Español
 Français
Welcome to your official guide for mastering one of the most crucial rituals of hot tub ownership: the quarterly drain and refill. As of today, think of this not as a chore, but as hitting the reset button on your personal oasis. Over time, even with perfect daily chemical care, your water accumulates Total Dissolved Solids (TDS)—a buildup of minerals, chemicals, and organic matter that makes it harder to balance and less pleasant to soak in. Draining your outdoor spa every 3 to 4 months is the definitive solution to restore its sparkle, safety, and performance .
This comprehensive guide will empower you to perform this essential reset with the confidence of a seasoned professional. We'll walk you through every step, from preparation to the final, perfect chemical balance, ensuring your outdoor tub remains the pinnacle of relaxation and rejuvenation.
Table of Contents
- Prepping for Success - The Essential Pre-Drain Checklist
- The Main Event - A Step-by-Step Guide to Draining and Refilling
- The Art of the Reset - Rebalancing Your Water Chemistry from Scratch
- Pro-Level Maintenance - Integrating Seasonal Needs and Smart Technology
Prepping for Success - The Essential Pre-Drain Checklist
A smooth drain-and-refill day begins with preparation. Rushing this process is a common mistake that can lead to frustration . Before you pull the plug, let's get organized.
Choose Your Day Wisely
Timing is more important than you might think. Plan your maintenance for a mild, overcast day if possible.
- Avoid Extreme Cold:Crucially, never drain your hot tub if the ambient temperature is at or below freezing (32°F / 0°C) . Even small amounts of water left in the plumbing can freeze and cause catastrophic damage to pipes and components .
- Avoid Intense Sun:In hot climates, direct sunlight on an empty acrylic shell can cause damage over time. An overcast day is ideal to protect the surface of your outdoor tub .
Gather Your Tools and Supplies
Have everything you need on hand to make the process efficient.
- Equipment:
- Garden hose
- Sump pump (optional, but highly recommended for speed)
- Soft, non-abrasive cloths or sponges
- Bucket
- Shop vacuum (optional, for removing the last bit of water)
- Cleaning Agents:
- A hot tub plumbing line cleaner
- A non-foaming, pH-neutral shell cleaner specifically for acrylic surfaces
- A chemical filter cleaner solution
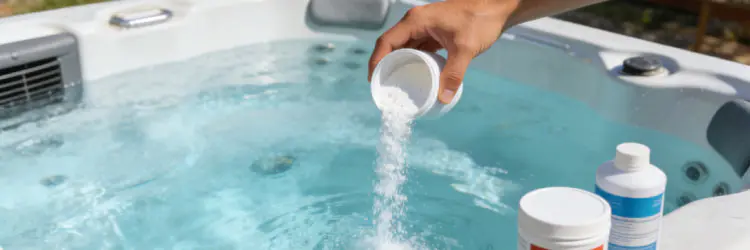
- Water Chemistry Supplies:
- Fresh, reliable water test strips or a liquid test kit
- All necessary balancing chemicals: pH increaser/decreaser, alkalinity increaser, calcium hardness increaser, and your preferred sanitizer (chlorine or bromine) .
Safety First: The Golden Rule
Before any work begins, you must completely disconnect the power to your hot tub.
CRITICAL SAFETY STEP: Go to your home’s main electrical panel or the dedicated outdoor breaker box for the spa and turn off the breaker connected to your hot tub. This is a non-negotiable step to prevent severe electrical shock . If your spa has a plug-in cord, ensure it is unplugged from the outlet.
The Pre-Drain Purge
The invisible enemy in any hot tub is biofilm—a slimy buildup of bacteria that lives inside the plumbing lines. A quarterly drain is the perfect time to eradicate it.
- Before draining, follow the instructions on a dedicated plumbing line cleaning product.
- This typically involves adding the cleaner to your old water and running the jets for a specified period (often 20-30 minutes).
- You may see unpleasant gunk and foam appear at the surface; this is a good sign that the cleaner is working, purging contaminants from the pipes before you drain them away for good.
The Main Event - A Step-by-Step Guide to Draining and Refilling
With your preparations complete and the power safely off, it’s time for the main event.
Step 1: Drain the Water
You have two main options for draining your hot tub:
- Gravity Drain:Most hot tubs have a built-in drain spout near the base. Attach your garden hose, open the valve, and let gravity do the work. This method is simple but can take several hours.
- Sump Pump:For a much faster drain (typically under 30 minutes), place a submersible sump pump in the deepest part of the footwell. This is the method most professionals use .
Ensure the hose is positioned in a location that can safely handle several hundred gallons of chemically treated water, such as a storm drain. Avoid draining directly onto your lawn or garden beds, as the chemicals can harm plants .
Step 2: The Deep Clean
An empty hot tub is a rare opportunity for a thorough cleaning.
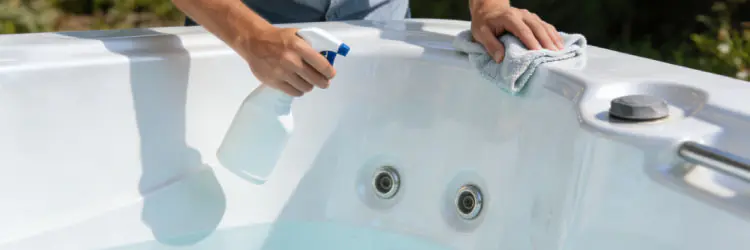
- Clean the Shell:As the water level drops, start cleaning the acrylic shell from the top down using your specialized shell cleaner and soft cloths. This prevents a "scum line" from drying onto the surface . Never use abrasive household cleaners, which can permanently scratch the acrylic.
- Remove and Soak Filters:Take out your filters. This is the time for a deep chemical soak. Place them in a bucket with a filter cleaning solution according to the product's directions. This dissolves stubborn oils and mineral deposits that simple rinsing can't remove . Let them soak while you finish the rest of the cleaning.
- Final Details:Once the tub is empty, use a shop vacuum or sponge to remove any remaining puddles. Wipe down the jets, headrests, and the lip of the spa.
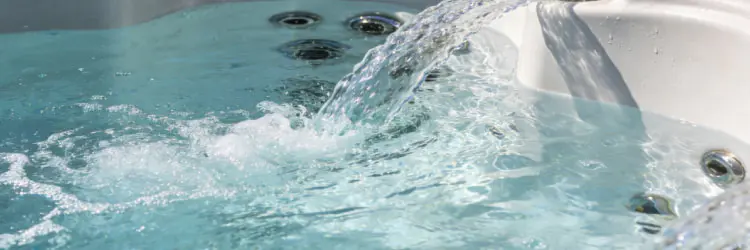
Step 3: The Refill
Refilling your hot tub correctly is key to avoiding a common and frustrating problem: an air lock. An air lock is a trapped bubble of air in the plumbing that can prevent your pumps from priming and circulating water.
PRO TIP: How to Prevent Air Lock. Do not just drop the hose into the main part of the tub. Instead, place the end of your garden hose inside the filter compartment or housing . As the spa fills, water will push through the plumbing system from the inside out, purging air as it goes. If your water source has high levels of sediment or metals, consider using a hose-end pre-filter.
Step 4: Power Up and Inspect
Once the water level is above the highest jets, it’s time to bring your spa back to life.
- Close the Drain:Ensure the drain valve is securely closed.
- Install Clean Filters:Thoroughly rinse your now-clean filters and reinstall them.
- Restore Power:Go back to the breaker and turn the power to the hot tub back on.
- Initial Circulation:The hot tub should enter its start-up or "priming" mode. Let the pumps run on a low setting for 10-15 minutes to ensure all air is out of the lines and water is circulating properly through all jets.
- Turn on the Heater:Set the heater to your desired temperature.
The Art of the Reset - Rebalancing Your Water Chemistry from Scratch
You now have a tub full of fresh, clean water—a perfect blank canvas. Resetting the water chemistry correctly is the final, critical phase. The order in which you add chemicals matters immensely . Adding them in the wrong sequence can make balancing a frustrating, drawn-out process.
Always test your water before adding any chemicals. Run the jets for a few minutes after each chemical addition to ensure it circulates fully before re-testing .
The Correct Order of Balancing Operations
- Establish Calcium Hardness (CH)
- Target Range:150 - 250 ppm (parts per million)
- Why it's first:Water with low calcium is "soft" and aggressive. It will try to pull calcium from any source it can, including your spa’s heater element, seals, and shell, causing corrosion and damage over time. Establishing the correct hardness level first protects your investment. Use a calcium hardness increaser if your source water is too soft.
- Adjust Total Alkalinity (TA)
- Target Range:80 - 120 ppm
- Why it's second:Total Alkalinity acts as a buffer for your pH. Think of it as the anchor that keeps your pH from swinging wildly up and down. If your TA is not in range, you will never be able to keep your pH stable . Use an alkalinity increaser (sodium bicarbonate) to raise it.
- Dial in the pH
- Target Range:2 - 7.8 (Ideal: 7.4 - 7.6)
- Why it's third:With alkalinity set, you can now accurately adjust the pH. Proper pH is essential for two reasons: bather comfort (water outside this range can irritate skin and eyes) and sanitizer effectiveness. Your sanitizer (chlorine or bromine) works dramatically less effectively when the pH is too high . Use a pH increaser (soda ash) or a pH decreaser (sodium bisulfate) to adjust.
- Introduce Your Sanitizer
- Target Range (Chlorine):3 - 5 ppm
- Target Range (Bromine):4 - 6 ppm
- Why it's fourth:Now that the water is balanced and receptive, you can establish your sanitizer level to keep the water safe and free of bacteria. Add your sanitizer according to the manufacturer's directions for a fresh fill.
- Shock the Water
- Why it's last:Once your sanitizer level is established, it's a best practice to shock the water with a non-chlorine oxidizer (or a chlorine shock, depending on your system). This initial high dose eliminates any contaminants from your source water or that were lingering in the plumbing, starting you off with the purest environment possible.
|
Water Chemistry Parameter |
Industry Standard Range (2026) |
Purpose & Importance |
|
Calcium Hardness |
150 - 250 ppm |
Protects equipment and surfaces from corrosion (low) or scaling (high). |
|
Total Alkalinity |
80 - 120 ppm |
Buffers and stabilizes pH, preventing drastic fluctuations. |
|
pH Level |
7.2 - 7.8 (Ideal 7.4-7.6) |
Ensures sanitizer efficacy and bather comfort. |
|
Sanitizer (Free Chlorine) |
3 - 5 ppm |
Kills bacteria, viruses, and algae, keeping water safe. |
|
Sanitizer (Bromine) |
4 - 6 ppm |
Kills bacteria, viruses, and algae; more stable at high temperatures. |
Pro-Level Maintenance - Integrating Seasonal Needs and Smart Technology
Your quarterly drain day is the perfect opportunity to bundle other important maintenance tasks, making your overall care routine more efficient and effective .
Sync Your Maintenance Schedule
While the hot tub is empty or refilling, perform these checks:
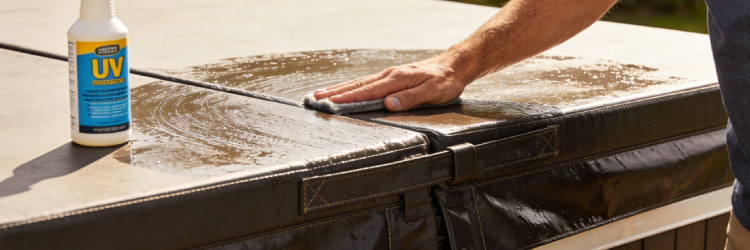
- Deep Clean the Cover:Clean the top of your cover with a gentle soap and water, then treat it with a UV protectant conditioner to prevent cracking and fading from sun exposure.
- Inspect Components:Visually inspect jets for damage, check that diverter valves turn smoothly, and ensure headrests are in good condition.
- Cabinet and Hardware Check:Wipe down the outer cabinet and check that all screws on the access panels are secure.
Leveraging 2026's Hot Tub Technology
The world of hot tub maintenance is evolving. The latest innovations are focused on reducing chemical usage and making monitoring easier.
- Sustainable Secondary Sanitizers:Many modern outdoor spas are equipped with secondary sanitation systems like Ozone (O₃) generators and Ultraviolet (UV-C) light purifiers . These systems are powerful oxidizers that destroy many contaminants on contact, significantly reducing the amount of chlorine or bromine needed to keep your water clean . They don’t replace your sanitizer, but they act as a powerful teammate. Your quarterly drain is a great time to check that these systems are functioning (e.g., see the glow of the UV lamp or smell the faint scent of ozone).
- Smart Monitoring Systems:The biggest trend for 2026 is the integration of smart technology. Systems with app-based controls allow you to monitor and manage your hot tub from your phone . These systems can provide real-time water chemistry readings, send alerts when pH or sanitizer levels are off, and allow you to adjust settings remotely. This technology makes the re-balancing process after a refill faster and more precise than ever before.
Embrace the Rhythm of a Healthy Hot Tub
Mastering the quarterly drain, refill, and rebalance is the single most impactful thing you can do to ensure a consistently amazing hot tub experience. It is the foundation of clean, safe, and sparkling water. By following this guide—prepping properly, cleaning thoroughly, refilling smartly, and balancing methodically—you transform a daunting task into a simple, empowering ritual.
Mark your calendar for your next quarterly reset. Embrace the process as an act of care for your investment and for your well-being. The reward is months of flawless, rejuvenating soaks in your perfectly maintained outdoor spa. Your future self will thank you.
_02-2.jpg?imageView2/2/w/320/h/320/format/jpg/q/75 "Whirlpool Massage Bath SPA RL-6155/1570")
-2.jpg?imageView2/2/w/320/h/320/format/jpg/q/75 "67'' Oval Freestanding Bathtub RL-MF1235/1708")


.jpg?imageView2/2/w/320/h/320/format/jpg/q/75 "Glass freestanding shower cabin shower RL-513(B)")

_sherry_01.jpg?imageView2/2/w/320/h/320/format/jpg/q/75 "Steam Cabin RL-D04(B)-Sherry")
_01.jpg?imageView2/2/w/320/h/320/format/jpg/q/75 "Adult bathtub cabin shower room steam RL-D03(B)")